
Map layout
The Herenga ā Nuku map gallery is the home of all of our maps.
Users can
- access the different maps available
- log in to their account, and
- view and manage their saved maps
Each map uses our standard map viewer to display map layers and information. See descriptions below for details on the map gallery and viewer functionality.
Map gallery layout
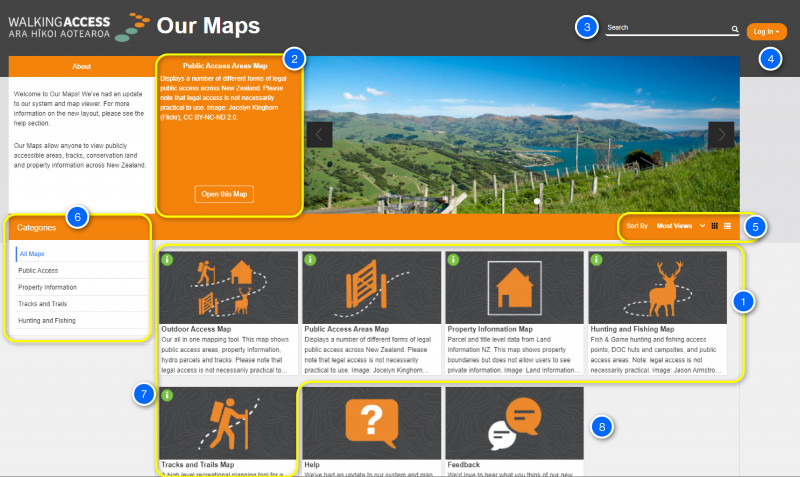
- Map selection — The highlighted map tiles are links to each of the main five maps that are all visible by default - click on any of these to view that map.
- Map description — A brief overview of the map’s purpose and information included within it. Click on the “Open the map” button to launch the map. Use the grey arrow buttons to cycle through different maps.
- Search — Search a map by a particular keyword. Corresponding maps that fit that keyword will be displayed in the map selection.
- Log in — Log in to Our Maps to save maps and drawings for later use. You can log in via Facebook or Google+.
- Sort maps by — Sort maps by most viewed, most recently added, or alphabetically. Click on the drop-down to select from one of these options.
- Categories — Each map has one or more categories that that you can sort. These include Public Access, Property Information, Tracks and Trails, Hunting and Fishing. By clicking on any of these you can filter the map selection by map categories, which essentially summarise what information we show on each map.
- More info — Click on the green icon to find out further technical information about a map, such as a full description, access use, and data constraints and credits.
- Help and Feedback — click on the "help" tile for help. To give feedback or suggestions through Our Maps feedback form, click on the "Feedback" tile.
Map viewer layout
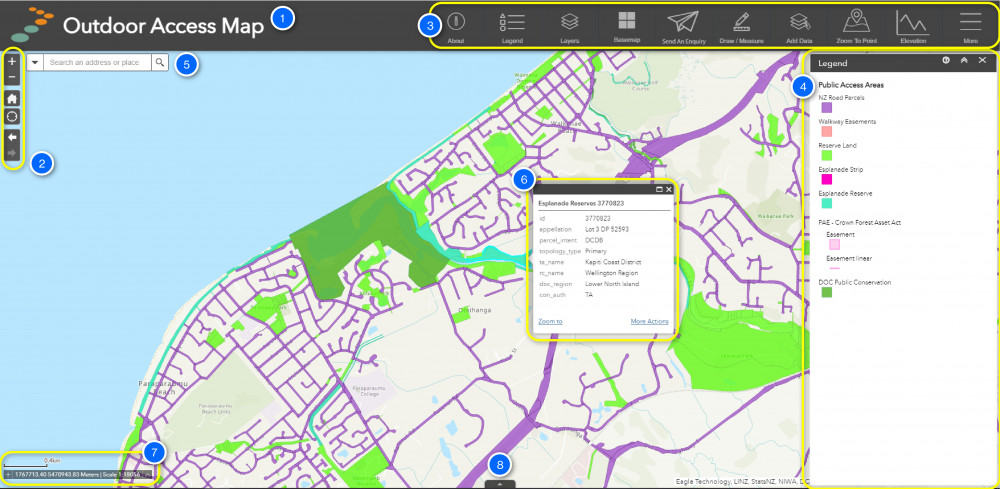
- Map title — The name of the current map. This is also a link back to the gallery if you want to log in or view another map.
- Navigation tools — zooming in and out, finding your location, and returning to the default view. For more information on this, see the navigation section.
- Tool menu — displays a selection of map tools. To activate them click on them, one at a time. These vary from basic to advanced uses — for more information on each tool see our map tools section.
- Tool pane — The large box on the righthand side of the map displays information from the tool that is currently in use, from the map legend (as shown), layer list, basemap selector, or about section. Click on the currently selected tool to hide the tool pane.
- Search bar — Use the search bar to find a location or address. By default, we set this to searching by place-name and address but other layer searching is available, depending on the map.
- Pop-up pane — Displays detailed information about a particular feature on the map, where that information is available. When you click on a feature (such as a public access area, title, parcel or track) in the map viewer, it will launch the pop-up pane. Please note: information embedded in the basemaps will not produce a pop-up.
- Coordinates and scale bar — Shows the map scale at the current zoom level and the coordinates of the mouse pointer. To generate coordinates of a particular location, click the "locate" button on the left of the coordinates bar, then click a location on the map. This will generate the coordinates in the bar. To change the coordinate system, click the drop-down on the right.
- Attribute bar tab — Opens the attribute bar, which shows rows and records for each layer on the map, in the current map view. Click on the tab to open and close the attribute bar. For more information on how to use the attribute bar, see the map tools section.
Or